Written By Bobby. On Nov 15. In Workshop Layout
Copy and paste my woodshop layout over your woodshop layout, and you’re done! You’ll have the best shop ever. It will be awesome. Not.
I came up with my layout based on what works for me. But I used principles I learned and figured out, and arrived at an arrangement different from most other shops. While staring at your woodshop design, have a checklist of layout principles and design criteria to one side. Put the priority ones at the top of the list and try not to compromise those.
You can find some of those principles in several previous posts, Revolutionize your Woodworking Enjoyment, Part I, Part II, and Part III, as well as the list later in this post.
Only you know how you most often work in the shop. If you do mostly turning, then determine your workflow of processing new stock, and match part of your layout to that. Would you like two or three lathes? Put that in your design, even if you haven’t bought them yet. Arrange those machines with the clearance you need to work, and place stations nearby that you go to most often while at the lathe. Perhaps your sharpening station wants to be close by, and you’d benefit from a small cart to plop stuff you’ve finished turning.
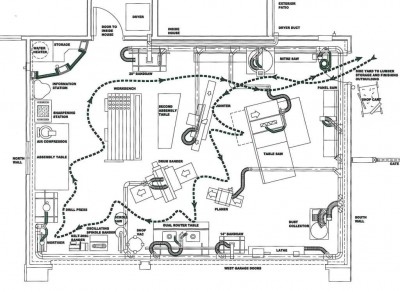
This layout changed many times, but mostly on paper. I went through the motions in my shop to test various ideas for how things should be ordered and angled until I arrived at this.
My Design Process
Your experience will also tell you what you’d like to incorporate into your design. But you probably won’t remember them all off-hand. So, have a whiteboard or notepad with you while in the shop, and list things that frustrate you as you encounter them. Since you’ll take a few weeks to design your layout anyway, use some of that shop time to zero in on the issues you want to solve. As you develop your design, test some of your layout theories in real life. Disconnect your dust collection and move your machines to the new locations you’re thinking of. Then try it out. Tweak and rotate them until you’re happy.
WoodChip Tip: Remember to measure and draw your tool and machine positions so you can put things back into place after rolling things around for a temporary operation.

Once you get into it, writing your criteria will just flow. Start mindmapping it, see the post "Discover the Process of Designing Your Ultimate Woodshop".
If you look at a lot of woodworking magazine layout drawings, you know that there is little design insight given as to why things are located where they are. If you walk those layouts in your mind, you see that most don’t make sense for you. But if you knew what “rules” they used to arrive at their layout, you’d have learned something useful.
- What compromises did they make?
- What things did they not allow any compromises on? Why?
- Did they allow for future growth?
- What would they change?
- How did the dust collection and electrical outlet locations affect their design?
WoodChip Tip: Even if you don’t have a particular tool yet, when no one’s looking, pretend it’s there and go through the motions. Do a little dance at the end of the session if you’ve locked onto your ideal layout.
Some Design Principles To Consider Adding to Your Checklist:
- To me, the king of your layout should be the ease of transitioning from one station to another. Minimize walking, turning, going around other tools, etc. when arranging each area.
- Dedicate “zones” for each of your major types of operations (Stock Breakdown, Stock Milling, Shaping, Finish-Prep/ Sanding, Assembly, Finishing, etc.)
- Consider “work clusters” for each of these zones. In my lumber milling area, I use the table saw, jointer, and planer to S4S boards. So, I arranged these in a cluster that made maneuvering from one to the next easy. My next goal is to integrate a shop cart so I can wheel the parts I’m working on from one machine to the next without piling them on the machine surfaces.
- Infeed/ Outfeed zones for each tool. Leave room to maneuver stock without worry you’ll bump into something.
- You can save space by making one tool surface the outfeed table for another tool.
- Dedicate a station for each operation–Table Saw station, Sanding, Router Table, Sharpening, Assembly, etc.
- Think of your tools and machines as “Stations” rather than just tools. Design ways to store related jigs, adjustment tools, gadgets, dust brushes, and bits/blades right at the station. Don’t put those things in a cabinet across the shop.
- Open space in one or two areas for project staging, and misc. future needs
- Keep in mind that your shop will evolve over time because things change and you will get new tools, too. So your infrastructure will need to be able to support this (dust collection duct branches, electrical outlets). You might even get into a new facet of woodworking, such as turning or furniture repair.
- Plan your dust collection and electrical infrastructure around your ideal layout, but show dust collection connections and electrical outlets (both 120V and 220V) in enough locations so that you can move machines later on if you want to.
- Save space by asking yourself what things really need floor space. Can you put the clamps on a rack under your assembly table instead of having them on a floor-mounted rack? Is there a wall near your assembly table the clamps could be placed?
- Some space-saving measures are ok, such as integrating a downdraft table into your workbench, if that won’t interfere with your benchwork, or increase your set-up time.
- Make sure you’re capable of running several projects at once. So, if you’re waiting for glue to dry on one build, your machines are clear and ready to use for a second or third project. This means you need room, perhaps wall shelves, to store glue-ups while they dry out of the way.
- Your finishing areas should be in a dust-free environment, ideally in a separate room or outbuilding
- Save additional room by only storing some lumber in the shop. Look at having a separate lumber storage room or outbuilding.
- Allow tools that aren’t used very much to be located out of your normal workflow.
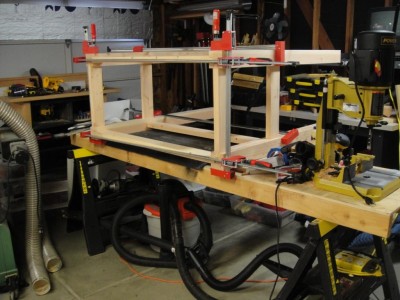
I still feel like I lack space to assemble things. Besides making a dedicated Mortiser Station, I’ll need to keep making more storage space to clear more clutter. This is why I integrated a second assembly table into my layout.
Leave Room For Project Assembly
Maximize horizontal table surfaces–workbench, shop cart, assembly tables(s). Give yourself shelves under these tables, add drawers and other storage room to keep those top surfaces clear. Think of those top surfaces like an aircraft carrier deck–nothing is allowed on them unless they are being actively used or need to be at-the-ready. Otherwise make sure those things have a convenient home. Things that are a pain to put away won’t be.
Implement Your Checklist
Use design principles to drive the layout of your shop. Before you know it, it’ll come together. Using these principles, coupled with your own experience will give you a good outline to design from. Revamp your shop layout like this and you’ll never regret it. Personally I find it as fun to do this as I do to make furniture. One supports the other.
Leave a comment below and tell everyone some of the principles you wish you incorporated into your shop from the beginning.
Connect with me on Facebook, and follow me on Twitter for more ninja tips to Optimize Your Woodshop!
Gotta get more clamps,


 How I went from a cluttered and disorganized shop to a super-productive layout with a convenient dust collection and electrical set-up.


