Written By Bobby. On Dec 09. In Design Process
Once you’ve got the core shop design principles in your design, and you’ve written the order of construction, you can head to the shop and assign yourself the first tasks. Perhaps it’s vacuuming off the dusty walls and running wire to new outlet boxes and circuit breakers.
This question could be asked about a lot of things in life, but I’m asking this about your workshop design. If you’re suffering from paralysis by analysis, you may know the feeling. I’ve spent a lot of time developing my ideal woodshop on paper, doing tons of research, diligently taking notes while in my various shops, and I still feel like it’s not done or exactly the way I want it. Is there a way to just get started and actually implement it?
Elephants Know When to Stop
There are elephants trained to paint on canvas with brushes held by their trunks. For some reason, they know when it’s done, and they stop painting and wait for a new canvas. We’re kind of the same; I think I’d know if it were done, but if I waited until then it would be several more years before I start building it.
Instead, I use the 80/20 rule. This says that 20% of your efforts will result in 80% of the benefits or impact. It could be 90/10, or something similar. What it’s saying is that by narrowing your tasks down to the important few, you can enjoy the majority of the results with dramatically less effort. This helps you prioritize and bypass overwhelm.
I know that if I design a shop in a good location, have a layout that fits my workflow, the environment is comfortable in any season, and I at least have the tools I use most of the time, good dust collection, decent electrical layout, and good lighting, then I’m 80% there. The rest are secondary details, and there are thousands of them that can become 80% of your design content. The design for each station, how many drawers you need at your router table, how many of each type of clamp do you need, do you need to store clamps at several stations, and on and on. So 20% of your design has like 80% of the benefit. And you can probably start building some of your design once the major principles are locked in. The extra details will come later as I’m into the “build” part of my ideal woodshop.
In my List of Drawings, I would like to create detail drawings for each station, such as a new router table, workbench, mortiser station, sharpening station, assembly table, and so forth. But those don’t need to be designed in super detail before I get started installing ductwork. However, I do need to be sure of my proposed layout before I start wiring up my shop. Knowing what affects what is important – it allows you to pause to take care of high-impact tasks. That’s when I realized I should write an “Order of Construction” list. That way, I’ll have thought through what I need to build first.
WoodChip Tip: There is a similar order to the build side as well. For example, you may not want to insulate your stud bays until you finish the electrical wiring. You should define your “Order of Construction”, and while you’re at it, identify those things you can skip for now so that you get the important things designed and built.

I’ve long known that if I sit down at a bookstore, coffee shop, or library (especially after a Starbucks) the ideas start flowing. I do my best design in this environment. Remember that a small percentage of the things you do have the most benefit (80/20 rule), so find that 20% and do more of it!
For me, it helped to have an overall outline of my entire shop design. If you sign up for the AWSD newsletter “The Other Side of Zero” in the right-hand column, you’ll get this outline in PDF format you can print out. I recommend you start listing your criteria for an ideal shop under each of the categories and sub-categories. Knowing the big picture first will help you determine what you can design a little later. You should also allow yourself to have temporary set-ups as functional place-holders. For example, my workbench is a machined 2×4 frame with a plywood top. It’s part of my design to have an “ultimate” workbench, but I need something functional now so I can build the other parts of the shop. Don’t put everything on hold to wait for an improvement that doesn’t truly stop you from woodworking.
Take a look at Before You Build Your Dream Woodshop for some questions to ask yourself to prioritize your shop’s needs so you can focus on the most important first. Then check out the Revolutionize Your Woodworking Enjoyment series to get started.
Some Order is in Order
I decided to do a thorough job on the highest priority elements of my ideal woodshop, and identified the small things I could afford to design later with little or no impact on what I’m constructing now. There is an order of design, and you’ll find you need to define some things first before you can design other elements.
For example, you want to think through your dust collection duct-runs before laying out the lighting locations. Then you should revise your duct routing if it interferes with your lighting. You wouldn’t want your ductwork causing shadows on a workstation!
What about your shop’s doors? Do you need a wider door to your backyard? Perhaps take care of that before putting drywall around the existing doorframe. Of course, your electrical wiring (including for future tools) wants to be installed before you insulate the walls. Want AC or an exhaust fan in the future? Overhead air cleaner? Give yourself separate circuits for those items and run to a box prior to finishing the walls.
WoodChip Tip: By building in some flexibility to your shop, you’ll be able to tweak some things down the road as you’re building. If you placed enough outlets around your shop on enough separate circuits, you can relocate that bandsaw or add a drum sander. Then you don’t have to be afraid of locking yourself in to an exact shop layout.
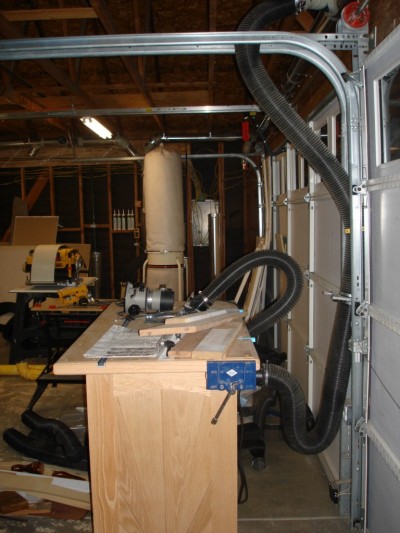
Now that I’ve got my layout, dust collection, and electrical done, my next goal is to get the envelope (walls, roof, doors) under control with regard to temperature. But, I’ll add two more 220V outlets, and add one more dust collection tap before I do this.
At first, when I decided to do a complete design from scratch, I assumed I’d do a quick layout, decide where ducts would go, place switches, and then hang some lights. When I dug into the world of shop design, I discovered a whole warehouse of worms. It took awhile, but I think I found the most important worms in there, and I’m mostly done with designing for the basics. As I build, I’ll think of more things, tweak the design, and continue to design the other elements.
Oh, and before I forget, give a deadline to yourself for tasks. I found myself going into my shop saying “Dang, this place needs improvement” but didn’t know where to start unless I had pre-thought the wisest thing to begin working on. Even after that it seemed like forever before I’d start on it until I gave myself a deadline. We all know things tend to take as much time as you give them; give yourself two weeks and it’ll take two weeks. Give yourself the same task and it’ll take one week. Amazing how that happens. So, give yourself slightly less time than you think it’ll actually take you. And make an agreement with yourself that all else is on hold until that primary task is done.
Breaking up your shop improvement tasks into 1 or 1-1/2 hour blocks of time is also something that works for me. That way I don’t procrastinate doing a 6-week shop renovation. I just go in the shop, insulate and seal a few stud bays, then go work on a woodworking project. Pretty soon it’ll be all done, and when the summer hits, I will have more shop time in my newly insulated, radiant-barrier clad walls. Since I’m doing all the important high-impact stuff first, I’ll get the biggest bang for my time that I set aside for shop upgrades.
Is there anything stopping you from starting your woodshop transformation? If you take the time to design the most important elements of your shop, you can get started implementing them, and concurrently be designing other elements of your shop.
Connect with me on Facebook, and follow me on Twitter for more ninja tips to Optimize Your Woodshop!
Gotta get more clamps,


 How I went from a cluttered and disorganized shop to a super-productive layout with a convenient dust collection and electrical set-up.


