Written By Bobby. On Feb 03. In Shop Systems
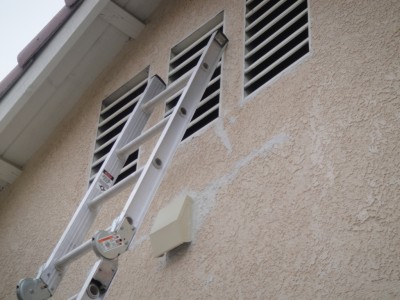
After installing the exhaust fan in my remodeled bathroom, I sealed the vent termination. Later, when the house is painted, it’ll blend in seamlessly. Water intrusion was the main concern. There is a built-in backdraft damper inside to limit air infiltration.
Just like with building a house, there are things to do to the exterior of your garage shop to give you the day-to-day convenience you crave.
You also don’t want to be surprised by all the things that will affect the exterior walls of your shop, like air conditioner refrigerant line penetrations, louvers, exterior light fixtures, and conduit to power outbuildings for lumber storage. All of those things need to be waterproofed, but the good news is you can draw those details when you plan your wall layers.
If you include the things mentioned below in your overall woodshop design plan, it’ll be easy. Do your thinking now, and the whole process can be done assembly-line style.
At Your Service
You’re outside. Still doing woodworking, but setting up two saw horses to sand a batch of cabinet doors. You’d like to be next to your shop, but the nearest outlet is inside your shop, requiring an extension cord. Now you have to untangle that…
When I moved in my house 4 years ago, one of the first projects I did was install two outdoor convenience outlets. One at my front door so I could use my electric trimmers in the yard, and one outside my workshop so I could work out there without worry.
What other utilities do you want? Water? Light to work in the evening? Motion-activated security light?
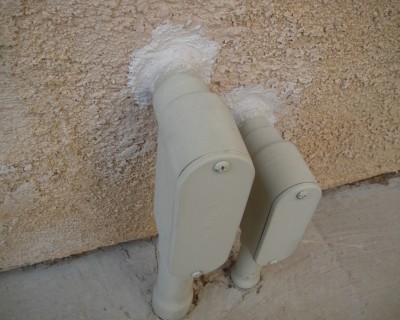
These conduit body fittings allow future access to wiring that will run to the outbuildings. For now, They’re unpowered, and the wall penetrations into the garage shop are sealed.
Lighting
My house, when I bought it, really lacked light. Inside and out. Just a few builder-provided cheesy light fixtures on the exterior, that’s it. Since I do a lot of woodworking and making stuff at night, this was a problem for me.
In my side yard, outside my garage shop, a corner is formed by the shop that the single light fixture can’t get to, so it’s dark there. In my woodshop plan, I’m putting in three light fixtures. One on each corner controlled by a switch, and another one for security controlled by a motion sensor. A motion sensor beeps inside my house if it’s triggered, letting me know some live creature is in the area.
Water
To me this is a big deal. During my “whole-shop cleanouts”, I like to take everything that I can wash and put it on the concrete and hose it all down. Having another hose bib also lets me water plants in that area, as well as hose down the exterior of the shop when it gets dirty.
In fact, I even extended that pipe into my shop and put a hose bib there too. I use it to wash down the floor once every three or four months to clean out any debris or cobwebs, and gives me the opportunity to reorganize things.
Electrical
As mentioned above, you’ll probably want at least one outdoor convenience outlet. I have a 20A outlet, 120V. Some may even want a 220V outlet. Now, since it’s outside, it’ll need to be waterproofed, and in an approved weather-proof box. Check your local building department (Electrical Plan Check) for a list of requirements that an inspector would want to see.
For the most part, I use this outlet for sanding, cutting up larger items with a reciprocating saw to fit in my trash, and garden tools. I control this outlet with a switch from inside my shop so nobody can use my electricity while I’m away.
Also, don’t forget to do stuff for the future. I know, for example, that I want to build two small outbuildings. One would be for mass lumber storage, and the other would be a finishing room to keep things dust-free and easy to clean.
But, my electrical panel is in my shop. I ran conduit through the outside wall of my shop, installed a junction box with access, and then some conduit under the cement slab to the approximate area of the future buildings.
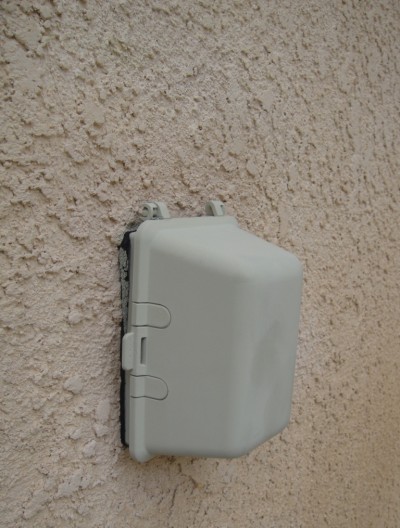
This outlet serves the side yard and the workshop. I use it when I set up saw horses to sand, spray finish on a nice day, or use electric yard tools. Since there’s a nice large concrete slab, I find myself using a reciprocating saw and cutting up stuff to fit in the trash.
Create an Air-Sealed Envelope for Your Workshop
If you’ve been reading this blog for awhile, you know I love to seal all gaps airtight. That’s so the shop can hold a relatively constant temperature, keep out bugs, and keep sound from coming in or leaving.
But sealing the interior walls isn’t enough. The exterior walls want the same treatment.
What exactly needs to be sealed?
Plan for these things on the workshop walls:
- Hose bib piping going through the wall, ¾”
- Exterior light fixture junction box (controlled by switch)
- Exterior security light
- Plumbing lines to your shop bathroom (should you want one), including waste and vent, cold water, hot water.
- Fresh air intake louvers (since my shop will be tightly sealed, I’ll probably want an energy-recovery intake fan).
- Conduits going from the shop or to the shop.
- Refrigerant lines from your indoor AC unit to the outdoor condensing unit.
- Condensate drain from the workshop AC unit.
- Gas line to your shop’s heater.
- Flue vents from water heaters, or your shop’s gas heater.
- Exhaust vents or “eyebrows” from dryers or other fans.
- Dust collection exhaust (if you live in a large enough property to do that…but then you’ll need an intake louver too).
- Solatube or other skylight fixtures.
- Any attachments to the wall like vine trellises used for shade.
Looks like a lot, right? Well your actual list will probably be much less when you eliminate the items that don’t apply to you.
WoodChip Tip: You can use sheet metal flashing/ counterflashing, caulking, and spray foam to seal cracks, seams, and small openings. Keep in mind that spray foam may not put up with direct exposure. You should protect these foamed openings with a harder material to prevent rats and other things from getting through. A tip I’ve heard is embed steel wool in cavities because rats won’t chew it; it cuts their mouth so they avoid it.
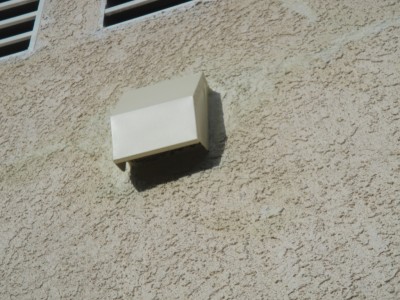
After I sealed this new exhaust vent, I also took the time to seal some cracks around the gable louvers you see above. Adding a tighter screen also helps keep small debris and bugs out. The builder installed a ¼” wire mesh, which is inadequate.
Below is an example of a detail I’m using for duct penetrations to my walls. There are many ways of doing this, but you can Google around online for the different methods people use. You should walk around the outside of your existing shop and check for missing or cracked caulking, evidence of moisture damage, and other opportunities for tightening up your shop’s envelope. You’ll have less bugs, and it’ll be easier for your workshop to hold temperature.
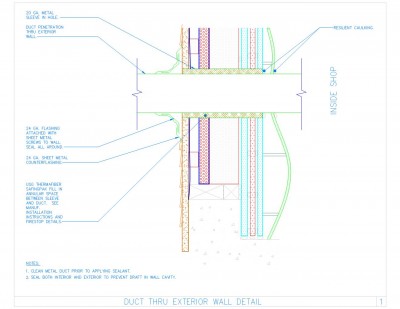
I’m using this detail for my dryer duct that runs along the wall between the house and garage shop. In the future, I may add an exhaust duct and fresh air intake duct.
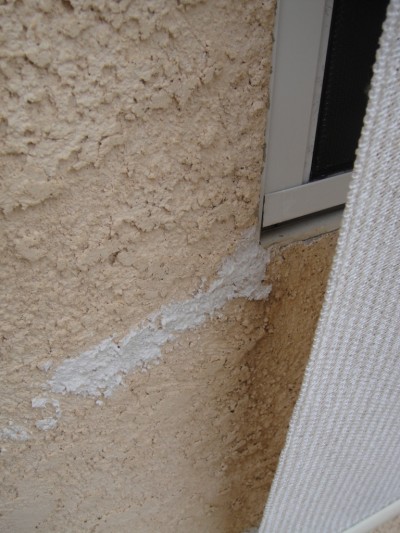
Here I’m on my walk-around, using special stucco sealant, which will keep the “sandy” texture of the stucco. When the house is painted, these repairs will disappear. When doing this, think like a bug, and a drop of water. The screen you see to the right is my exterior solar shade. Makes a HUGE difference in the summer.
Landscape
I’m using landscape for several things, and there are some important features you’ll want to incorporate now so you don’t have to come back later and fix them.
I’m adding foliage for a bit of shade, which includes some bushes/ fountain grass, and a wall trellis to shade my south wall. The trellis will be mounted a few inches away from the wall surface, but will be mounted to the wall.
Also, if you have a window, it may be wise to plant some cactus or other spiky plant to deter a burglar from getting easy access to it.
To prevent bugs from easily marching and living all over your house or woodworking shop, keep plants from touching the structure (and providing a bridge) as much as practical. They can still get to your house, but don’t make it easy and inviting.
Be careful you don’t provide “shelter” for a burglar where they can be hidden from view. Remember thieves hate to be seen, so make sure you’re not providing a prowler a line-of-sight shield. This will make them feel constantly uneasy, and they’ll more likely be spooked and move on. This makes alarms more effective too.
Lastly, purposely slope your soil away from your structure/ slab or crawlspace. This will help prevent water from accumulating and sitting there, which will rot your siding or framing.
I’m putting in a French drain type system to handle rain; it’ll collect and whisk it away further down the yard. I also added rain gutters a few years ago so that I control where the water goes, rather than it all splashing on the ground and getting the lower part of the wall full of mud.
If you have a basement, you’ll probably want to really waterproof the walls, especially the portions that are buried, and also have a drainage system to keep water from accumulating along your exterior. A backup sump pump seems like a good idea in case you do get basement flooding while you’re not home.
WoodChip Tip: Since I live in a hot climate, my goal is to put as much of the shop walls in shadow as I can. Trellises, decorative grass, and even sculptural screens would help.
Roof
I know it sounds like I said seal everything, but actually it’s seal your shop’s envelope. Remember that depending on your roof system (i.e. attic vs. cathedral), your envelope may not really include your roof. I have an attic style roof, so I’ll have an insulated ceiling. The ceiling is the boundary of my shop’s envelope. The goal in this system is keep the space within the envelope at a comfortable temperature for humans, but have the attic temperature mimic the outdoor temperature to avoid moisture problems. You don’t want the attic to be warm during the winter or you’ll get tons of moisture problems, including ice dams. Likewise, you don’t want the attic to get heat trapped in the summer and becomes degrees hotter than outside. The way to keep the attic the way it wants to be is to ventilate it.
This means that you’ll have holes on the exterior of your shop or house. For me, I have soffit vents at the low end of the roof, and a gable louver vent at the high end of the roof. Some people have ridge vents along the apex of the roof.
While I want air to get in my attic via convection (hot air rises and draws in outside air in, etc.), I don’t want water to get in. So, my soffit vents are deep under the roof eave or overhang, and my gable vent is a louver with vanes that are designed to keep water coming from above (rain) out.
Also, I don’t want burning embers getting sucked in during a brush fire. This is a very common cause of hundreds of homes igniting during brush fire season. Many homes by default are fitted with ¼” mesh screens over their vents, but I installed 1/8” or finer mesh because ¼” isn’t effective at all. They also sell products specifically designed to prevent this. I opted to spray the inside of the truss bays, especially near the soffit vents, with a fire retardant, and to line the inside of the holes with firecaulk. I put a screen over the gable louver too.
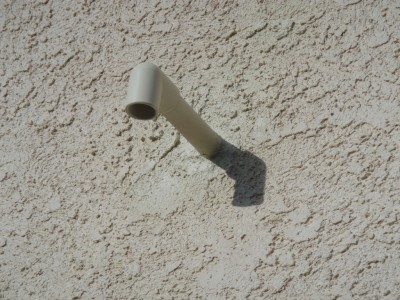
This condensate overflow drain pipe was virtually unsealed by the builder. Doing a quick survey around your house or workshop, preferably with sealant in-hand will tighten up your envelope, keeping you bug-free and your heating/ cooling systems from running less often.
Think About Rainy Days
As you might have experienced, rainy days are awesome. There’s something about being in the shop on a rainy day. But, what if your shop is across the yard? What if your lumber shed is 50 ft. away?
A sheltered walkway between these structures would be really handy. Since my outbuildings are remote from my shop (but not too far) I can put in an architecturally pleasing walkway shelter from point A to point B. It’ll help shade part of my yard, too.
Plus, by having a nice paved path, you can roll a shop cart to carry lumber from one building to the other. I see myself carting projects to be finished from the garage shop to the finishing room using this path.
Also consider putting an overhang near the access door to the outside. It’s nice to be able to step out the door and be under a shelter while watching the rain.
For more guidance in assembling your Workshop Design, click on the Starting? Go Here! category and read those first.
Connect with me on Facebook, and follow me on Twitter for more ninja tips to Optimize Your Woodshop!
And, if you’re on Twitter, be sure to follow #woodchat every Wednesday night, at 6:00 pm, PST.
Gotta get more clamps,


 How I went from a cluttered and disorganized shop to a super-productive layout with a convenient dust collection and electrical set-up.


